Vado/Como Gen2 and Turbo Tero: Battery LED Error Codes
Guidelines:
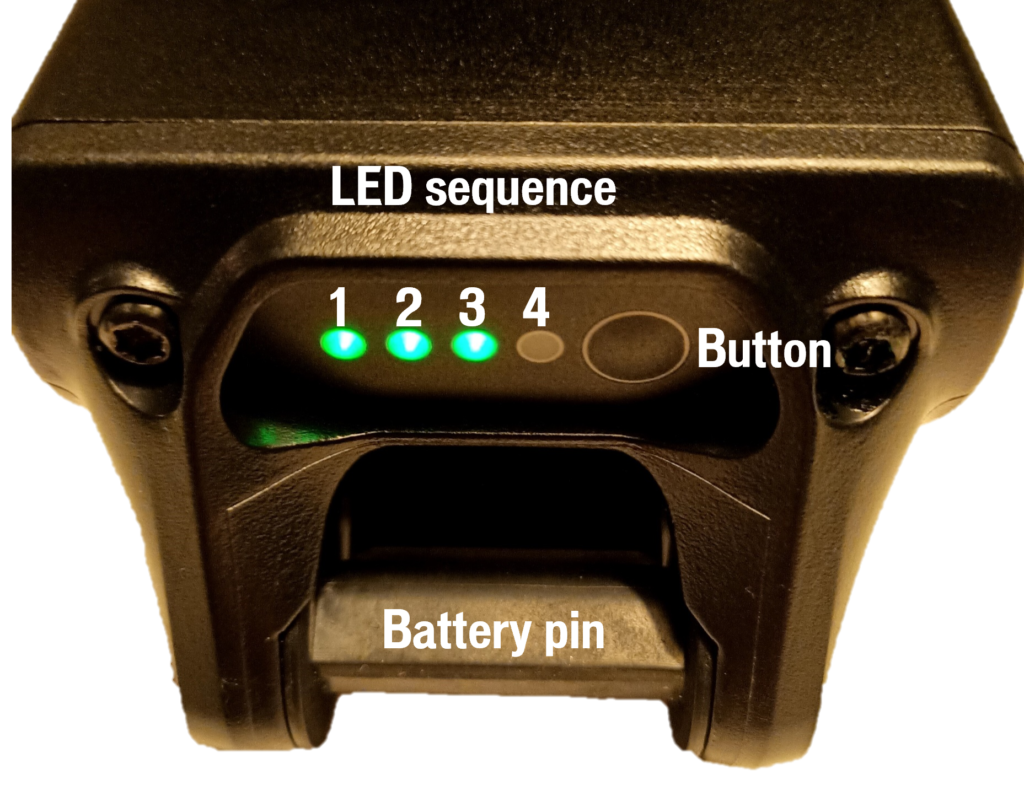
- The battery LEDs are only visible when the battery is removed from the frame
- Always power off the bike before connecting the charger or before removing the battery
- Always disconnect the charger from its power source when not in use or when carrying out any checks
- Run digital diagnostics: connect the bike to Turbo Studio and follow applicable Service Actions in the Event Log
| LED BEHAVIOUR | NUMBER(S) IN BELOW SEQUENCE | MEANING |
 | 1-4 (depends on charge level) | BATTERY IS CHARGING (only visible when battery removed) Three steady and one blinking LED shows that the battery is between 76 and 100% state of charge. Charge status is only shown on the battery while charging, not riding. The MasterMind TCD shows the charging status as % figure when charging the battery in the bike. |
 | 3 (flashing) | OVER OR UNDER TEMPERATURE PROTECTION The battery management system detected that the battery cells are out of the allowed temperature range to be charged. Allow the battery to come to room temperature before attempting to charge or continuing the ride. |
 | 4 (flashing) | SHORT CIRCUIT PROTECTION The battery management system detected a short circuit event. Try these steps to solve/identify the problem: 1. Disconnect the charger from the power source and remove the charging plug from the battery. 2. Check the battery charge port and charging plug for any contamination with metallic debris or other particles. Clean all ports with a soft brush or cloth. |
 | 1&4 (flashing) | OTHER POSSIBLE INTERNAL FAULT The battery management system detected an internal error. Try these steps to solve/identify the problem: 1. Use the battery diagnostics program on the Service Website to force a shut-down and to diagnose the battery. 2. Connect the bike to Turbo Studio and follow applicable Service Actions in the Event Log 2. Try it on another bike before continuing diagnostics. |
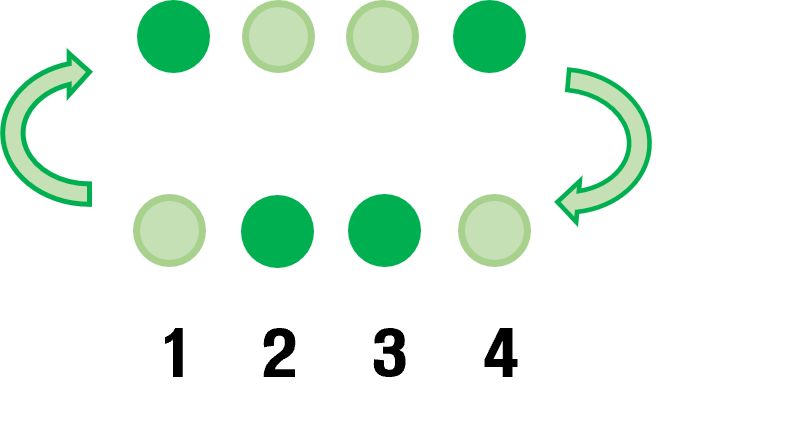 | LED 1/4 and 2/3 are on and show this alternating pattern | CHARGE OVER CURRENT The battery management system detected too much current. Try these steps to solve/identify the problem: 1. Disconnect the charger from the power source and remove the charging plug from the battery. Check the battery charge port and charging plug for any contamination with metallic debris or other particles. Clean all ports with a soft brush or cloth. 2. The charger is faulty – try a known good charger with the battery. 3. It was attempted to charge with a non-approved charger. Only use original and compatible Specialized chargers. |
LED Sequence
DIAGNOSTICS NOTES & TIPS
- If the bike can be powered on, connect it to Turbo Studio and check the Event Log for any Service Actions
- Swap batteries between bikes
- Does the „Battery Error” follow the battery to a known good bike? Does the error go away, if a known good battery is installed on the suspected faulty bike?
- Remove the battery, connect a charger to the battery and observe the response of the four LEDs. Do they respond at all? If the LEDs do respond, do they respond with an error code or normally?
- Connect the battery to the Battery Diagnostic Program to confirm if the battery has a permanent fault. There are two methods of connecting a battery to the Battery Diagnostic Program:
- Connect a charger to the battery and see if the LEDs at the charge port respond. If they do, leave the charger connected for ~15 seconds and then disconnect the charger to immediately connect the battery to the battery Diagnostic Program. The battery will be in an ‘awake’ state after being connected to the charger and should communicate with the program.
- Use the Y-Cable (98916-5646) to connect the battery to the program. Connect the Diagnostic Tool to one of the plugs on the double-sided end of the Y-Cable and the charger to the other plug. Then connect the single side of the Y-Cable to the battery charge port. Let the battery sit like this for ~15 seconds to give the charger a chance to wake the BMS in the battery. Then launch the Battery Diagnostic Program.